Tuesday, 29 October 2013

Using MySQL with Multi-volume DRBD resource


There are many different ways of achieving high availability for MySQL. DRBD (Distributed Replication Block Device) is one of the leading solutions for MySQL HA (High Availability), in this blog I would demonstrate how to configure, install and test MySQL and DRBD.

Quick overview of DRBD

DRBD synchronizes data at the block device (typically a spinning or solid state disk) – transparent to the application, database and even the file system. DRBD requires the use of a journaling file system such as ext3 or ext4. For this solution it acts in an active-standby mode – this means that at any point in time the directories being managed by DRBD are accessible for reads and writes on exactly one of the two hosts and inaccessible (even for reads) on the other. Any changes made on the active host are synchronously replicated to the standby host by DRBD.

Pre-Requisites 

Two servers, each with:

* Redhat/Centos 6.3
* Network connectivity
* MySQL 5.5 or later
* Unpartitioned space on the local disks to create a DRBD partitions, in this example I would use LVMs as DRBD backing device.

For simplicity, servers are named as host1 and host2.
host1: 192.168.0.6
host2: 192.168.0.7

Following configuration files are created:

/etc/hosts (host1)


 /etc/hosts (host2)


Ensure DRBD user-land tools are installed

Firstly use yum to check that they aren’t already there (if “Repo” is set to “installed” then it is already installed):


 Check if kmod-drbd84 is installed. Please ensure that both modules should have same version number:


These packages don't come in the default yum repository, so you may have to download them:
wget http://elrepo.org/linux/elrepo/el6/x86_64/RPMS/kmod-drbd84-8.4.1-1.el6.elrepo.x86_64.rpm
wget http://elrepo.org/linux/elrepo/el6/x86_64/RPMS/drbd84-utils-8.4.1-1.el6.elrepo.x86_64.rpm

And install it if not :
yum install drbd84-utils  kmod-drbd84 -y


The same steps should be performed on host2


Configure DRBD/FileSystem

Confirm that you have a volume group available to spring LVMs


In this case I have  Volume Group 'vg0' that has free 3Gb space. I would create two lvms on both hosts:

[root@host1 ~] lvcreate --name data --size 1G vg0
[root@host1 ~] lvcreate --name logs --size 1G vg0

[root@host2 ~] lvcreate --name data --size 1G vg0
[root@host2 ~] lvcreate --name logs --size 1G vg0


Note: If you don't have any Volume Group available but have empty partition available. Click here to learn more about how to create Volume Groups/LVMs.

The new LVMs would be used as a resource, managed (and synchronized between hosts by DRBD); for this reason a new DRDB resource file must be created in the /etc/drbd.d/ directory; the contents should look like this:


The same configuration file must be copied over to the same location on the second host:

scp /etc/drbd.d/r0.res host2:/etc/drbd.d/

At this point, I would disable firewall on host1 and host2 to allow communication on required ports (7789 and 7788)

Next, meta data should be created for the DRBD resource (r0), on each host perform following:

[root@host1 ~]# drbdadm create-md r0

[root@host2 ~]# drbdadm create-md r0

Now we should start DRBD daemon on both hosts (run the command about the same time on each host, because DRBD need to communicate with each other).

[root@host1 ~]# /etc/init.d/drbd start

[root@host2 ~]# /etc/init.d/drbd start

In order to create the file systems (and go on to store useful data in it), one of the hosts must be made
primary for the 'r0' resource:


[root@host1 ~]# drbdadm -- --overwrite-data-of-peer primary all

Now that the devices are available on drbd0/drbd1, so it is possible to create a file system on it
 

[root@host1 ~]#  mkfs -t ext4 /dev/drbd0
[root@host1 ~]#  mkfs -t ext4 /dev/drbd1

Install and configure MySQL
MySQL binaries should be installed on both of the servers.

[root@host1 ~]#  yum install mysql-server mysql -y
[root@host2 ~]#  yum install mysql-server mysql -y

Create following directories on both hosts:

mkdir /var/lib/mysql_data_drbd
mkdir /var/lib/mysql_binlog_drbd

chown -R mysql:mysql /var/lib/mysql_data_drbd
chown -R mysql:mysql /var/lib/mysql_logs_drbd

At this stage we should mount DRBD devices (on primary host1), so that we can initialize MySQL data directory:

[root@host1 ~]# mount /dev/drbd0 /var/lib/mysql_data_drbd
[root@host1 ~]# mount /dev/drbd1 /var/lib/mysql_logs_drbd

[root@host1 ~]# mkdir /var/lib/mysql_data_drbd/data
[root@host1 ~]# mkdir /var/lib/mysql_logs_drbd/logs

Ensure that host1 is currently primary and DRBD backing devices are up.


Edit the /var/lib/mysql_data_drbd/my.cnf file and set datadir=/var/lib/mysql_data_drbd/data and log_bin=/var/lib/mysql_logs_drbdb/logs in the [mysqld]
section. Also ensure that the socket is configured to /var/lib/mysql/mysql.sock and the pid file to
/var/lib/mysql/mysql.pid.

Here is MySQL configuration file on host1:


Create symlink for MySQL options file on both hosts:

[root@host1 ~]#  rm -f /etc/my.cnf
[root@host1 ~]#  cd /etc
[root@host1 ~]#  ln -s /var/lib/mysql_data_drbd/my.cnf my.cnf

[root@host2 ~]#  rm -f /etc/my.cnf
[root@host2 ~]#  cd /etc
[root@host2 ~]#  ln -s /var/lib/mysql_data_drbd/my.cnf my.cnf

Now install default MySQL database files:

[root@host1 ~]# mysql_install_db --no-defaults --datadir=/var/lib/mysql_data_drbdb/data --user=mysql

Start MySQL server
Lets start MySQL server and insert some test data:

[root@host1 ~]# mysqld --defaults-file=/etc/my.cnf &
[root@host1 ~]# mysql -e "CREATE DATABASE IF NOT EXISTS mysqlslap; USE mysqlslap; CREATE TABLE IF NOT EXISTS test (a INT, b VARCHAR(200)); INSERT INTO test VALUES (1, 'mysql drbd')"

Manual failover

It is possible to migrate MySQL/DRBD resource to alternative host, steps to be performed:
On host1 (currently primary):

# Stop mysql instance
[root@host1 ~]#  mysqladmin -uroot -p shutdown
# umount drdb filesystems
[root@host1 ~]#  umount /var/lib/mysql_data_drbd; umount /var/lib/mysql_logs_drbd
# Switch DRBD to SECONDARY mode
[root@host1 ~]#  drbdadm secondry r0

On host2:
# Make this node PRIMARY
[root@host2 ~]#  drbdadm primary r0
# mount drdb filesystems
[root@host1 ~]#  mount /dev/drbd0 /var/lib/mysql_data_drbd
[root@host1 ~]#  mount /dev/drbd1 /var/lib/mysql_logs_drbd
# Start MySQL server
[root@host1 ~]# mysqld --defaults-file=/etc/my.cnf &


Monday, 10 June 2013

Restrictions on Replication with GTIDs

I came across some issues when converting MySQL regular replication to replication with GTIDs.
Keywords used in this document:

MySQL replication - Replication enables data from one MySQL database server (the master) to be replicated to one or more MySQL database servers (the slaves). Replication is asynchronous by default.

GTID - A global transaction identifier (GTID) is a unique identifier created and associated with each transaction when it is committed on the server of origin (master). This identifier is unique not only to the server on which it originated, but is unique across all servers in a given replication setup. There is a 1-to-1 mapping between all transactions and all GTIDs.For more information about GTIDs click here

Assumptions:
MySQL replication with GTIDs is up and running using  --enforce-gtid-consistency

Restrictions on Replication with GTIDs is documented here

1. Temporary tables - CREATE and DROP TEMPORARY tables are not supported inside transaction. e.g.

START TRANSACTION;
Query OK, 0 rows affected (0.00 sec)

CREATE TEMPORARY TABLE t2 like t;
ERROR 1787 (HY000): When ENFORCE_GTID_CONSISTENCY = 1, the statements CREATE TEMPORARY TABLE and DROP TEMPORARY TABLE can be executed in a non-transactional context only, and require that AUTOCOMMIT = 1.

2. Updates involving non-transactional storage engines - It is not possible to mix non-transactional tables (such as MYISAM) with innodb tables within the same transaction.
The same issue can arise if:

  • When master and slave database use different storage engines for their respective versions of the same table. e.g. Table 'A' on master database use Innodb, but the same table on replication slave host use MyISAM storage engine with table 'A'.
  • When MySQL configuration on master/slave hosts use different binary log format e.g. master host is configured to use 'ROW' format and slave host is using 'STATEMENT'

3. CREATE TABLE .... SELECT - It is not supported to perform such type of statements e.g.
create table t2 select * from t;
ERROR 1786 (HY000): CREATE TABLE ... SELECT is forbidden when ENFORCE_GTID_CONSISTENCY = 1.

Conclusion
 As work around CREATE/DROP temporary table statements can be performed outside transaction and CREATE TABLE ... SELECT could be performed using two statements such as CREATE TABLE t1; INSERT INTO t1 SELECT. Similarly, developers would be forced to convert non-transnational tables (e.g. MYISAM) to INNODB. In short, it would be a major code change for the existing application.

Tuesday, 14 May 2013

MySQL slow query example of Index Merge Intersection

My client reported a sudden slow query performance issue, the same query has been running fine for a long time and used to complete in under fraction of a second and now it's taking average 30 seconds to complete.  However, the same query runs fast on development server but slow in production.
MySQL processlist shows that  there are many threads running the same slow query, and the back log continue to grow...

Looking at SQL, it is not complex:

SELECT COUNT(*) 
FROM tblA
WHERE tblA.fkA_ID = 38926722
  AND tblA.fkAType_ID = 1
  AND tblA.fkADetail_ID = 476
  AND tblA.`Date` = '2013-05-10 07:14:41'
  AND tblA.Time = '2013-05-10 07:14:41'

And the EXPLAIN output is:
           id: 1
  select_type: SIMPLE
        table: tblA
         type: index_merge
possible_keys: FK_A_ID,FK_fkAType_ID,FK_fkADetail_ID,IX_Date
          key: FK_ApmAudit2ApmCase,FK_ApmAudit2ApmAuditType
      key_len: 4,1
          ref: NULL
         rows: 1
        Extra: Using intersect(FK_A_ID,FK_fkAType_ID); Using where
1 row in set (0.00 sec)

At first glance, it does not look too bad. MySQL is using two different indexes to search 1 out of 66M rows to return the count of total rows. It is worth mentioning here that column fkAType_ID is not very selective i.e. it holds value 1 or 2. Sadly, 90% of the rows had value 1. This means query is looking at millions of rows before doing index merge with column fkA_ID.

Ok, we know now what's wrong with the query, let's see what options do we have to to optimize this query:?

A) The table hasn't been purged for the past several months; this couldn't be done at this time
B) Pass index hints to the query optimizer to favor index on fkA_ID column.
SELECT COUNT(*) 
FROM tblA USE INDEX (FK_A_ID)
WHERE tblA.fkA_ID = 38926722
  AND tblA.fkAType_ID = 1
  AND tblA.fkADetail_ID = 476
  AND tblA.`Date` = '2013-05-10 07:14:41'
  AND tblA.Time = '2013-05-10 07:14:41'
Query OK, 1 row affected (0.20 sec)

Query completed in a fraction of a second, compared to 30 seconds! Lets look at EXPLAIN output:
*************************** 1. row ***************************
           id: 1
  select_type: SIMPLE
        table: tblA
         type: ref
possible_keys: FK_A_ID
          key: FK_A_ID
      key_len: 4
          ref: const
         rows: 179
        Extra: Using where
1 row in set (0.00 sec)

Once the backlog consumed, in the next available maintenance window, we purged historic data, removed index hints and added following index to the table:

ALTER TABLE tblA 
DROP INDEX `FK_A_ID`, 
ADD INDEX `FK_A_ID_DATE` (`fkA_ID`,`Date`)
Note: index on column FK_fkAType_ID is needed due to foreign key constraint. The table structure info:
CREATE TABLE `tblA` (
  `pkID` int(10) unsigned NOT NULL AUTO_INCREMENT,
  `fkApplication_ID` smallint(5) unsigned NOT NULL,
  `fkA_ID` int(10) unsigned NOT NULL,
  `fkAType_ID` tinyint(3) unsigned NOT NULL,
  `Date` date NOT NULL,
...
  KEY `FK_Application` (`fkApplication_ID`),
  KEY `FK_fkAType_ID` (`fkAType_ID`),
  KEY `IX_Date` (`Date`),
  KEY `FK_A_ID` (`fkA_ID`),
...
CONSTRAINT `FK_AType` FOREIGN KEY (`fkAType_ID`) REFERENCES `tblAType` (`pkAType_ID`),
...
) ENGINE=InnoDB AUTO_INCREMENT=505970021 DEFAULT CHARSET=utf8

Friday, 12 April 2013

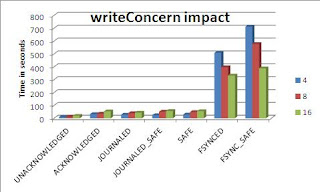
Mongo db stress test using different writeConcern

The aim is to determine how mongo performs using different writeConcern, which control the acknowledgment/quality of the write operations with various options, such as:
 ACKNOWLEDGED [default]
UNACKNOWLEDGED
JOURNALED
JOURNALED_SAFE
SAFE
FSYNCED
FSYNC_SAFE
WriteConern options are documented here: http://docs.mongodb.org/manual/core/write-concern/

Test results:  Total 200k documents are injected into 'user' collection using 4, 8 and 16 parallel threads
 

UNACKNOWLEDGED option is the fastest of all but not safe, on other hand FSYNC_SAFE is the most safe option but is the slowest of all..

Protecting MongoDB Server with Authentication


MongoDB supports a simple authentication model that allows the administrator to restrict access to databases on a per user basis.
MongoDB supports individual access control records on each database that are stored in a special system.users collection. For normal users to have access to two databases (e.g., db1 and db2), their credentials and rights must be added to both databases.
Note: Before you enable authentication on your server, make sure you have added your admin users to the admin database; if you enable authentication before adding the admin users, you will not be able to perform any actions on your database.

Adding an Admin User

Adding the admin user is as simple as changing to the admin database and using the addUser() command:
$ mongo
MongoDB shell version: 2.2.3
connecting to: test
> use admin
switched to db admin
> show collections
> db.addUser("admin","xxxxx")
{
        "user" : "admin",
        "readOnly" : false,
        "pwd" : "9f3121efccbe3fef09a799d5e63077c2",
        "_id" : ObjectId("5148475c7719ce8dd603e52d")
}
>
> exit
bye

Note: Any users added to the special admin database will have the same access rights on all databases

Enabling Authentication
Now you need to alter your server's configuration to enable authentication. Do so by stopping your server and adding --auth to the startup parameters.
$ grep auth /etc/mongod-rs0-1.conf
auth = true
 
$ sudo mongod --dbpath /mnt/mongodb/data/rs0-1-db --shutdown
killing process with pid: 26501
[1]+  Done                    sudo nohup mongod --config /etc/mongod-rs0-1.conf
Restart mongoDB:
$ sudo nohup mongod --config /etc/mongod-rs0-1.conf &
[1] 26982
[akhan2@eugenius ~]$ nohup: appending output to `nohup.out'

Authentication is done using db.auth():

> db.auth("admin","xxxxx");
1

Adding a Read-Only User

The addUser() function includes an additional parameter that allows you to create a user that has only read-only permissions. The MongoDB client will throw an exception if a process authenticated as the newly created user attempts to do anything that would result in a change to the contents of the database. The following example gives a user access to the database for status monitoring or reporting purposes:
First connect to mongo db as 'admin' user:
> use admin
switched to db admin
> db.auth("admin","123");
1
Grant Read-Only permission to user 'userA' on test db:
> use test
switched to db test
> db.addUser("readuser","xxxxx",true);
{
        "user" : "userA",
        "readOnly" : true,
        "pwd" : "e982ddebe2d61f96d42e78cd2033a69f",
        "_id" : ObjectId("51484a69ce8d584df56af233")
}

Test 'userA' authentication:

$ mongo
MongoDB shell version: 2.2.3
connecting to: test
> use test
switched to db test
> db.auth("userA","xxxx");
1
> db.akhan.find();
{ "_id" : ObjectId("514846197876222c62329f27"), "Ad" : 999919 }
{ "_id" : ObjectId("514846197876222c62329f28"), "Ad" : 999920 }

Deleting a User

To remove a user from a database, simply use the normal remove() function for a collection. The following example removes the user just added; note that you have to authenticate against the admin database before you can remove the user:
> use test
switched to db test
> db.system.users.remove({username:"userA"})

Thursday, 4 April 2013

Minimize MySQL replication lag

Replication lag occurs in many MySQL deployments. This often happens due to slow insert/update/delete query that cause the slave to fall behind. However, it could also happen due to high volume of writes to the master database. One of my clients (who use MySQL 5.1) reported replication lag on a slave host, there was no stuck/long query running to cause slave to fall behind. And MySQL process-list show that it's reading/applying events from relay log (i.e. from local copy of master binary logs):

| 2 | system user | | NULL | Connect | 779612 | Waiting for master to send event | NULL |
| 3 | system user | | NULL | Connect | 4215   | Reading event from the relay log | NULL |
And the replication latency continue to grow:  "Seconds_Behind_Master: 4234"
When we look at MySQL dashboard to check on database activity graph (see below), its doing only avg 170 inserts/second. 

MySQL config for replication slave hosts can be configured to behave differently, the benefit is to help assist with replication catch-up. In this scenario we changed the value of  innodb_flush_log_at_trx_commit  to 2 from default 1. After this change, significant increase in db activity was observed, replication lag started to reduce sharply, and replication caught up with MySQL database under 5 mins, see below db activity graph:


Thursday, 28 February 2013

MySQL 5.6 - Online DDL Operations

MySQL 5.6 supports several kinds of Online DDL operations on Innodb tables, so it is now possible to perform DML operations such as insert, update, delete and select operations on a table while DDL operation on the subject table is in progress. For more details I strongly advise you to read MySQL docs here and here. In this Blog I would demonstrate few quick examples:

a) Remove column from table 't1' -  DML operations can proceed while DDL is in progress i.e. ALTER TABLE .. DROP column..


mysql >show processlist;
+-----+------+-----------+------+---------+------+----------------+----------------------------------+
| Id  | User | Host      | db   | Command | Time | State          | Info                             |
+-----+------+-----------+------+---------+------+----------------+----------------------------------+
|  67 | root | localhost | test | Query   |    0 | init           | show processlist                 |
| 604 | root | localhost | test | Query   |    3 | altering table | alter table t1 drop column data2 |
+-----+------+-----------+------+---------+------+----------------+----------------------------------+
2 rows in set (0.00 sec)

mysql >insert into t1 values (null,'xxxx','yyyy');
Query OK, 1 row affected (0.00 sec)

mysql >select * from t1 where id=2;
+----+----------------------------------------------------+-------+
| id | data                                               | data2 |
+----+----------------------------------------------------+-------+
|  2 | aaaaaaaaaaaaaaaaaaaaaaaaaaaaaaaaaaaaaaaaaaaaaaaaaa | a     |
+----+----------------------------------------------------+-------+
1 row in set (0.00 sec)

b) Add new column table 't1' -  DML operations can proceed as long as they do not access the new column that is being added to the table:


mysql>show processlist;
+-----+------+-----------+------+---------+------+----------------+---------------------------------------------------------+
| Id  | User | Host      | db   | Command | Time | State          | Info                                                    |
+-----+------+-----------+------+---------+------+----------------+---------------------------------------------------------+
|  67 | root | localhost | test | Query   |    0 | init           | show processlist                                        |
| 604 | root | localhost | test | Query   |   38 | altering table | alter table t1 add column data2 varchar(20) default 'a' |
+-----+------+-----------+------+---------+------+----------------+---------------------------------------------------------+
2 rows in set (0.00 sec)

mysql>insert into test.t1 values (null,'xxxx');
Query OK, 1 row affected (0.02 sec)

mysql>insert into test.t1 values (null,'xxxx','yyyy');
ERROR 1136 (21S01): Column count doesn't match value count at row 1

Monday, 25 February 2013

Replication checksums in MySQL 5.6

Replication checksums is one of the listed new features of MySQL 5.6 , but data integrity might break as documented here replication-checksum. In reality this feature is not completely new to MySQL, in MySQL 5.5, and earlier replication checksums can be used by using SSL replication as a workaround. You can learn more about SSL replication here. Similarly you can see my blog post about SSL connections with MySQL here.
Please note, by default replication checksums are enabled. However following variables can be used to enable/disable checksums with master/relay logs:

a) Binlog_checksum - Its a dynamic variable. The default value is CRC32.  This variable causes the master to write a checksum for each event in the binary log

When enabled binary log provides the following information:

 1
 2
 3
 4
 5
 6
 7
 8
 9
10
11
12
13
14
#130225 15:33:56 server id 1  end_log_pos 384 CRC32 0x280a5e52  Intvar
SET INSERT_ID=1/*!*/;
#130225 15:33:56 server id 1  end_log_pos 499 CRC32 0x37e25d0a  Query   thread_id=1     exec_time=0     error_code=0
use `test`/*!*/;
SET TIMESTAMP=1361806436/*!*/;
insert into t1 values (null, 'mysql 5.6')
/*!*/;
# at 499
#130225 15:33:56 server id 1  end_log_pos 530 CRC32 0xf56d77c4  Xid = 17
COMMIT/*!*/;
DELIMITER ;
# End of log file
ROLLBACK /* added by mysqlbinlog */;
/*!50003 SET COMPLETION_TYPE=@OLD_COMPLETION_TYPE*/;
The extra/new information that we see the above output such as
CRC32 0x280a5e52 

  
On the slave host:
b) slave_sql_verify_checksum: Its ENABLED by default. However, as per online docs (here),  this option is disabled by default, so I take it as documentation bug. When this option is ENABLED, slave host would examine and verify checksums when reading the relay log.
show global variables like 'slave_sql_verify_checksum';
+---------------------------+-------+
| Variable_name             | Value |
+---------------------------+-------+
| slave_sql_verify_checksum | ON    |
+---------------------------+-------+
1 row in set (0.00 sec)